Transfer files via LAN Ethernet
I had several large files that I wanted to download via the internet but my bandwidth is limited. So to get them to my PC, I must keep it on overnight. But this is costly electricity consumption wise and also the fans (and those RGB, why did I even fall for it) make quite some noise even at idle.
So I thought, why not just use my laptop and have it plugged in all night while downloading those files.
But then comes the hard part, to transfer those files from my laptop to my PC.
Well I could just use some service like pairdrop, but that would still take time as compared to wired means. But I didn’t have any usb type-A to type-A connector.
Then it struck me that what if I just connected both of them to their respective GigaBit Ethernet ports? Won’t that just work as well? Well yes ofcourse it would, but how to make them work. It isn’t like USB where we can just plug and play.
The main principle is that for 2 devices to transfer via Ethernet, they must be having IP addresses attached to their respective RJ-45 ports. And these IP addresses must belong to the same subnet. That’s it, this is all it takes to transfer files via Ethernet.
Steps to connect via Ethernet
1) Connect the Ethernet cable to both systems RJ-45 port.
2) Open terminal on both the systems and check the identifier/name of their Ethernet interface via:
1
ip addr
It should show all interfaces. The ethernet one usually starts with something like en… (like here):
 The second interface labelled enp0s31f6 is my Ethernet port
3) Now issue the following command to assign an IP address. Make sure to run this command on BOTH the systems to allow them to connect.
Replace the interface name as you have found above with the fields I am explicitly marking:
1
2
# Run this on Machine 1:
sudo ip addr add 192.168.1.2/24 dev <interface name>
1
2
# Run this on Machine 2:
sudo ip addr add 192.168.1.3/24 dev <interface name>
For example:
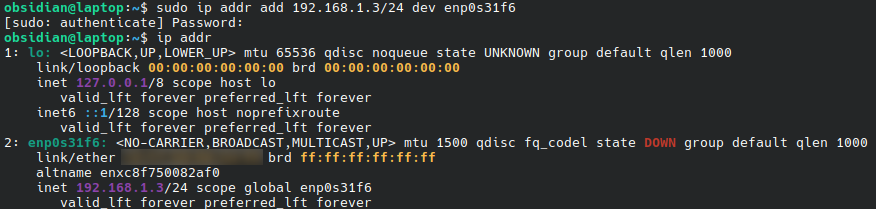 The second interface labelled enp0s31f6 now has an IP address (see purple) attached to it.
That’s it, you now have successfully connected the two systems together on the same network via Ethernet.
Next we need to transfer files between the two systems, and for that we would use RSYNC.
Steps to transfer files via Ethernet (rsync)
1) Run this command on the machine from where you wish to send the files from:
Please CHANGE the directory/files to whatever you wish to transfer! Also replace the “obsidian@192.168.1.2” part with the correct hostname and IP address of the receiver PC!
1
rsync -avzP Pictures/* obsidian@192.168.1.2:/home/obsidian/Pictures/
You could optionally also first include the “n” flag with rsync to do a dry run before transferring.